This is the culmination of the plugin discussion in:
Once I’m comfortable that the bugs are (mostly) squashed and I’ve had a chance to clean up and optimize the code, I’ll consider submitting it for inclusion in the official Picard Plugins list.
Format Performer Tags [Download]
Overview
This plugin allows the user to configure the way that instrument and vocal performer tags are written. Once
installed a settings page will be added to Picard’s options, which is where the plugin is configured.
What it Does
This plugin serves two purposes.
First:
Picard will by default try to order the performer/instrument credits by the name of the performers, summing up all instruments for that performer in one line. This plugin will order the performer/instrument credits by instrument, summing up all performers that play them.
So instead of this:
background vocals and drums: Wayne Gretzky
bass and background vocals: Leslie Nielsen
guitar, keyboard and synthesizer: Edward Hopper
guitar and vocals: Vladimir Nabokov
keyboard and lead vocals: Bianca Castafiore
It will be displayed like this:
background vocals: Wayne Gretzky, Leslie Nielsen
bass: Leslie Nielsen
drums: Wayne Gretzky
guitar: Edward Hopper, Vladimir Nabokov
keyboard: Edward Hopper, Bianca Castafiore
lead vocals: Bianca Castafiore
synthesizer: Edward Hopper
vocals: Vladimir Nabokov
Second:
This plugin allows fine-tuned organization of how instruments, performers and additional descriptions (keywords) are displayed in the instrument/performer tags.
Here is some background information about these keywords:
MusicBrainz’ database allows to add and store keywords (attributes) that will refine or additionally describe the role of a performer for a recording. For an artist performing music on an instrument, these are the three attributes (keywords) that MusicBrainz can store, and offer Picard:
- additional
- guest
- solo
For an artist performing with his/her voice, MusicBrainz has this restricted list of keywords describing the role or the register of the voice:
- background vocals
- choir vocals
- lead vocals
- alto vocals
- baritone vocals
- bass vocals
- bass-baritone vocals
- contralto vocals
- countertenor vocals
- mezzo-soprano vocals
- soprano vocals
- tenor vocals
- treble vocals
- other vocals
- spoken vocals
Picard can retrieve and display these keywords and will list them all together in front of the performer. The result will be something like this:
guitar and solo guitar: Bob 'Swift' Fingers
additional drums: Rob Reiner (guest)
additional baritone vocals: Hermann Rorschach
guest soprano vocals: Bianca Castafiore
The problem with this is that it is a bit indistinct if these keywords say something about the instrument, the artist and their performing role, the voice’s register, or the persons relation to the group/orchestra. For instance:
- ‘additional’ is referring to instrumentation. For example ‘additional percussion’.
- ‘guest’ is referring to the performer as a person. Indicating that they are a guest in that band/orchestra instead of a regular member.
- ‘solo’ is referring to a specific role a musician performs in a composition. For example a musician performing a guitar solo.
- ‘soprano vocals’ is saying something about the register of a performer’s voice.
So you might want to attach ‘solo’ to the instrument, ‘baritone’ to the vocals, and ‘guest’ to the performer. This plugin allows you to do that, so you could have something like this as a result:
guitar [solo]: Bob 'Swift' Fingers
drums ‹additional› : Rob Reiner (guest)
vocals, baritone ‹additional› : Hermann Rorschach
vocals, soprano: Bianca Castafiore (guest)
How it Works
This is the concept behind the workings of this plugin:
The basic structure of a performer tag such as Picard produces it is:
[Keywords] Instrument / Vocals: Performer
This plugin makes four different ‘Sections’ at fixed positions in these tags available. Their positions are:
[Section 1]Instrument / Vocals[Section 2][Section 3]: Performer[Section 4]
In the settings panel you can define in what section (at what location) you want each of the available keywords to be displayed. You can do that by simply selecting the section number for that (group of) keyword(s).
You can also define what characters you want to use for delimiting or surrounding the keywords. For some situations you might want to use the more common parenthesis brackets ( ), or maybe you prefer less common brackets such as [ ] or ‹ ›. Note that using default parenthesis might confuse possible subsequent tagging formulas in the music player/manager of your choice. You can also just leave them blank, or use commas, spaces, etc.
Note that the plugin does not add any spaces as separators by default, so you will need to define those to your personal liking.
Settings
The first group of settings is the Keyword Section Assignments. This is where you select the section in
which each of the keywords will be displayed. Selection is made by clicking the radio button corresponding
to the desired section for each of the keywords.
The second group of settings is the Section Display Settings. This is where you configure the text
included at the beginning and end of each section displayed, and the characters used to separate multiple
items within a section. Note that leading or trailing spaces must be included in the settings and will not
be automatically added. If no separator characters are entered, the items will be automatically separated
by a single space.
The initial default settings are:
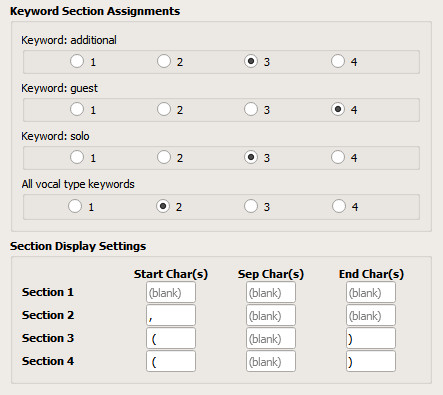
These settings will produce tags such as:
rhodes piano (solo): Billy Preston (guest)
percussion: Steve Berlin (guest), Kris MacFarlane, Séan McCann
vocals, background: Jeen (guest)
Examples
The following are some examples using actual information from MusicBrainz:
Example 1:
(add example)
Example 2:
(add example)
Example 3:
(add example)
Credits
Special thank-you to @hiccup for improvement suggestions and extensive testing during the development of this plugin, and for providing the write-up and examples that formed the basis for this User Guide.


