I used to use Hugin and it works pretty well - much better than Photoshop’s auto align. Getting good results sometimes requires a lot of effort, though.
These days I simply align the partial scans in Photoshop (but Gimp or any other image editing software that uses layers will work just as well). If you do it right, it’s a quick and simple process. I take two partial scans, find matching spots in one corner and align them (“difference” blend mode can be very helpful here). Then I put the top layer’s center of rotation to that spot and rotate the layer until two spots on the other end align as well. I do that with all four partial scans and then mask out the edges with a soft brush for smooth transitions between the layers Somethimes the last partial layer doesn’t fit perfectly, especially when the cover is a little warped. In those cases I transform the image a bit until it fits.
nice! that evens things out quite a bit.
If you want to take things further, you can copy the two aligned layers to a new layer group, shift them around for a better alignment in the corners (or anywhere it got blurry), mask out the group out and then paint it in again just where the different alignment is necessary.
I find Paint.net much easier for editing than GIMP. If I have something big I’ll make sure I put it on the scanner with something obvious to spot as an overlap. Carefully setting it straight on a scan on the left, then repeat for a scan on the right side. Ditto top and bottom. The most important step is carefully keeping things aligned to avoid having to twist my images.
Then use layers in Paint.NET to manually line up the multiple images. One image per layer. Have stitched large posters together this way. Also CD booklets. Each of those have helpful seams to work with for the alignment.
I just tried using the ofn-layer-aligner script from Ofnuts' Gimp Tools - Browse /scripts at SourceForge.net in Gimp and it did a pretty nice job of automatically aligning one layer to another. To use it, you make a path with 4 points:
two on one layer (bottom one, reference)
and the matching two on the other (top layer, transformed, must be the active layer)
and it scales/rotates/translates the active layer so that the two pair of points overlap.
ofn-layer-aligner
This script realigns an image over another by scaling and rotating it so that two designated points in the image comes to an exact overlap with two designated points in the reference image.
The script uses the default interpolation method.
To use:
Have the two images loaded as layers in the same Gimp image.
(recommended) Make the top image partially transparent.
Using the Path tool, create a path with 4 points:
The first two points over the reference image (the one that won’t move)
The next two points over the adjusted image
This path can be either a single stroke with 4 points, or two strokes of two points each.
Make sure the layer with the adjusted image is selected.
Call the script: Layer>Realign layer.
Restore the full opacity of the top layer.
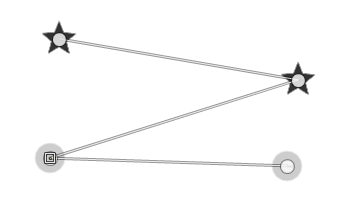
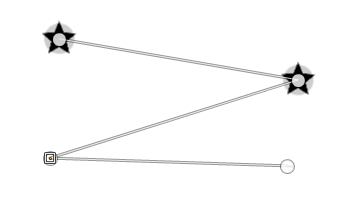
Example:
The stars are on the reference layer
The circles are on the adjusted layer
Before calling, the path goes through the two points of the reference layer, then through the two points of the adjusted layer:
After execution, the adjusted layer has been moved/rotated/scaled so that the points overlap:
Thanks for the Paint.net suggestion IvanDobsky. I’m working on linux so probably not an easy option for me. But I will try your suggestion on aligning the images on layers in GIMP.
Any of this, however, is more work than snapping a photo using Google Photoscan. I’ll have to compare the two to see whether the resulting artwork is noticeably better using the scanner.
Hmm, re. 10 and 12" covers I have left them in the too-hard box for now… I have plenty to keep me busy. Maybe I’ll get a big scanner when I retire. Currently I stitch multiple scans together by hand on photoshop when I add something big.
Your local library/heritage department probably has a big scanner which they wouldn’t mind you using
I think it’s really important to get the alignment perfect for this technique to be effective. The edited image is just slightly off, and I think the resulting fuzz on some of the details outweighs the benefits. Great technique though, hats off to the people who put in the work for this kind of restoration work. Including you if you stay on that road
Some of the above methods make my head spin. I am not an image editing expert, so I see the tools in a simple way. I see layers just like I would slice up photocopies, stacked on top of each other, and stick them together with tape.
I’ll use a hard edge on my scanner to align the cover to help to keep it straight and avoid any need to twist in the image editor. Your examples are tricky as they don’t always have a good sharp edge to align. Patience on the scanner is worth it.
I find layers are useful as they can be easily masked\cut\trimmed. Also can be flipped on and off or transparency changed to “look through” them when trying to get something perfectly aligned.
I won’t use the transparency on the final export - I’ll have made some hard cuts\masks and overlaid one image on top of the next as good as I can get when zoomed in.
I don’t butt the whole scanned images together. I’ll put a new sliced edge on one side of my image that I then paste into the new layer for alignment over the top of the other. Slicing like this helps avoid using the edge of a scan where focus may change. A cleaner cut is easier to hide
Cutting in the middle of text or a title is a good guide for me as the shape helps with the alignment of the two layers. That cartoon like image in your example would be an ideal one for me to do this with.
Also, do all the scanning from the same orientation. A cover being rotated will not stitch together as well due to different lighting of the paper. I often take the lid off my scanner and instead use a dark cloth over the top instead.
It comes down to how much patience you have. I would rather do it by eye than hope some algorithm will get it right. I also find I can get quite quick doing this.
One thing to remember - this website is not about image editing perfection. The images are about recognising if you have the same copy as someone else. So if someone zooms in on one of your images and complains about a bit of blur or imperfection from your editing process - ignore them. Do the best that makes you satisfied at having done a good job.
Looking at the quality produced so far, I don’t think you’ll have any problems on the quality front.
Good work on this, some comments on your Carly Simon example showing your proposed use of ‘Front’ and ‘Back’.
Some 45’s that I own, have a full cover without the hole to show the label from the single.
For example https://coverartarchive.org/release/ae33b899-67a4-4d6b-ba92-0dc073c4b93e/29053285044.jpg. To me, this is correctly labelled as ‘Front’. The other side of it with writing on it would be ‘Back’. This is consistent with cd and album artwork. I think that your two photos of the A and B side of the 45 are ‘Medium’. The one with the paper cover and the A side label showing, I’m less clear on, but I don’t think it is really the ‘Front’… I think its probably redundant and not worth uploading as you have the A and B sides already.
